Better. Software. Faster. - Part I: Mocks → Board.
So you have a complete set of product mocks... How do you get this thing over the finish line in record time?
In this guide, I'll teach you the 4 step process I use with my teams.
Step 1 - Reduction
Reduction is the process of understanding the whole of what you've drawn (that's right, product mocks are just drawings) as the sum of its parts.
Why Reduce?
If you're wondering what the point of this reduction exercise is, you're not alone. Let's look at this in terms we can all understand and identify with.
A Tiny Project
Let's say you have a 4 screen app, like a TODO app. You could pretty easily just open up your editor (vscode), get cracking, and knock a nice little app out with little or no effort toward organizing your work.
And you're probably not going to notice any speed loss, because the project is so small. If you do it fast, it takes a day. If you do it slow, it takes 1.5. Not a huge hit in clock time.
A Large, Team-Driven Project
Large projects are another animal. We have all likely worked on teams of 4+ people where it's difficult to know who's doing what, and we eventually blow a deadline set by executive OKR. We know that we need every little speed lift we can get.
Common lines I hear from engineering groups (even teams that I run) when these deadlines are missed are:
- "Well, it takes as long as it takes."
- "You can't put time deadlines on on-demand invention."
But I beg to differ. I believe that with some smart organizational effort (i.e. Reduction), you can
- Dramatically improve your teams pace
- Quickly understand what your team can accomplish within a time frame
How to Reduce a Project
So we now understand WHY the process of reduction is important: It gains us speed & clarity in large, team-oriented projects.
Now, we'll understand HOW to reduce a set of Mocks into a consumable task list that engineering can jump on.
You're going to start with 3-4 major buckets, and IN ORDER, go through each of these buckets, creating a list of items.
Here are your buckets:
| SCREENS | COMPONENTS | INFRASTRUCTURE | API |
|---|---|---|---|
Remember that ORDER IS IMPORTANT
Screens
This is where you will start. At this point, SCREENS are the easiest thing for you list off, because you're literally looking at the list of them in your Mocks.
I hate JIRA. I won't hate you if you choose JIRA, just know that every time a product organization chooses JIRA, a fairy and her puppy both die.
For each screen in your list of Mocks, just list them out. You could do this in a spreadsheet, like this:
| EPIC: SCREENS | Mock | Points |
|---|---|---|
| SignIn | link | 3 |
| SignUp | link | 3 |
| ForgotPassword | link | 3 |
| Dashboard | link | 3 |
| Posts | link | 3 |
| Post | link | 3 |
| PostNew | link | 3 |
| PostEdit | link | 3 |
| ... |
But I prefer to just duplicate lines in VSCode, so I would have an import .csv string going that looked like this:
Id,Type,Title,Labels,Estimate,Description
,Feature,SignIn,"MYAPP - SCREENS",3,link-to-mock-screen
,Feature,SignUp,"MYAPP - SCREENS",3,link-to-mock-screen
,Feature,ForgotPassword,"MYAPP - SCREENS",3,link-to-mock-screen
,Feature,Dashboard,"MYAPP - SCREENS",3,link-to-mock-screen
,Feature,Posts,"MYAPP - SCREENS",3,link-to-mock-screen
,Feature,Post,"MYAPP - SCREENS",3,link-to-mock-screen
,Feature,PostNew,"MYAPP - SCREENS",3,link-to-mock-screen
,Feature,PostEdit,"MYAPP - SCREENS",3,link-to-mock-screen
...
This is ready to highlight and paste into Pivotal Tracker's .csv importer.
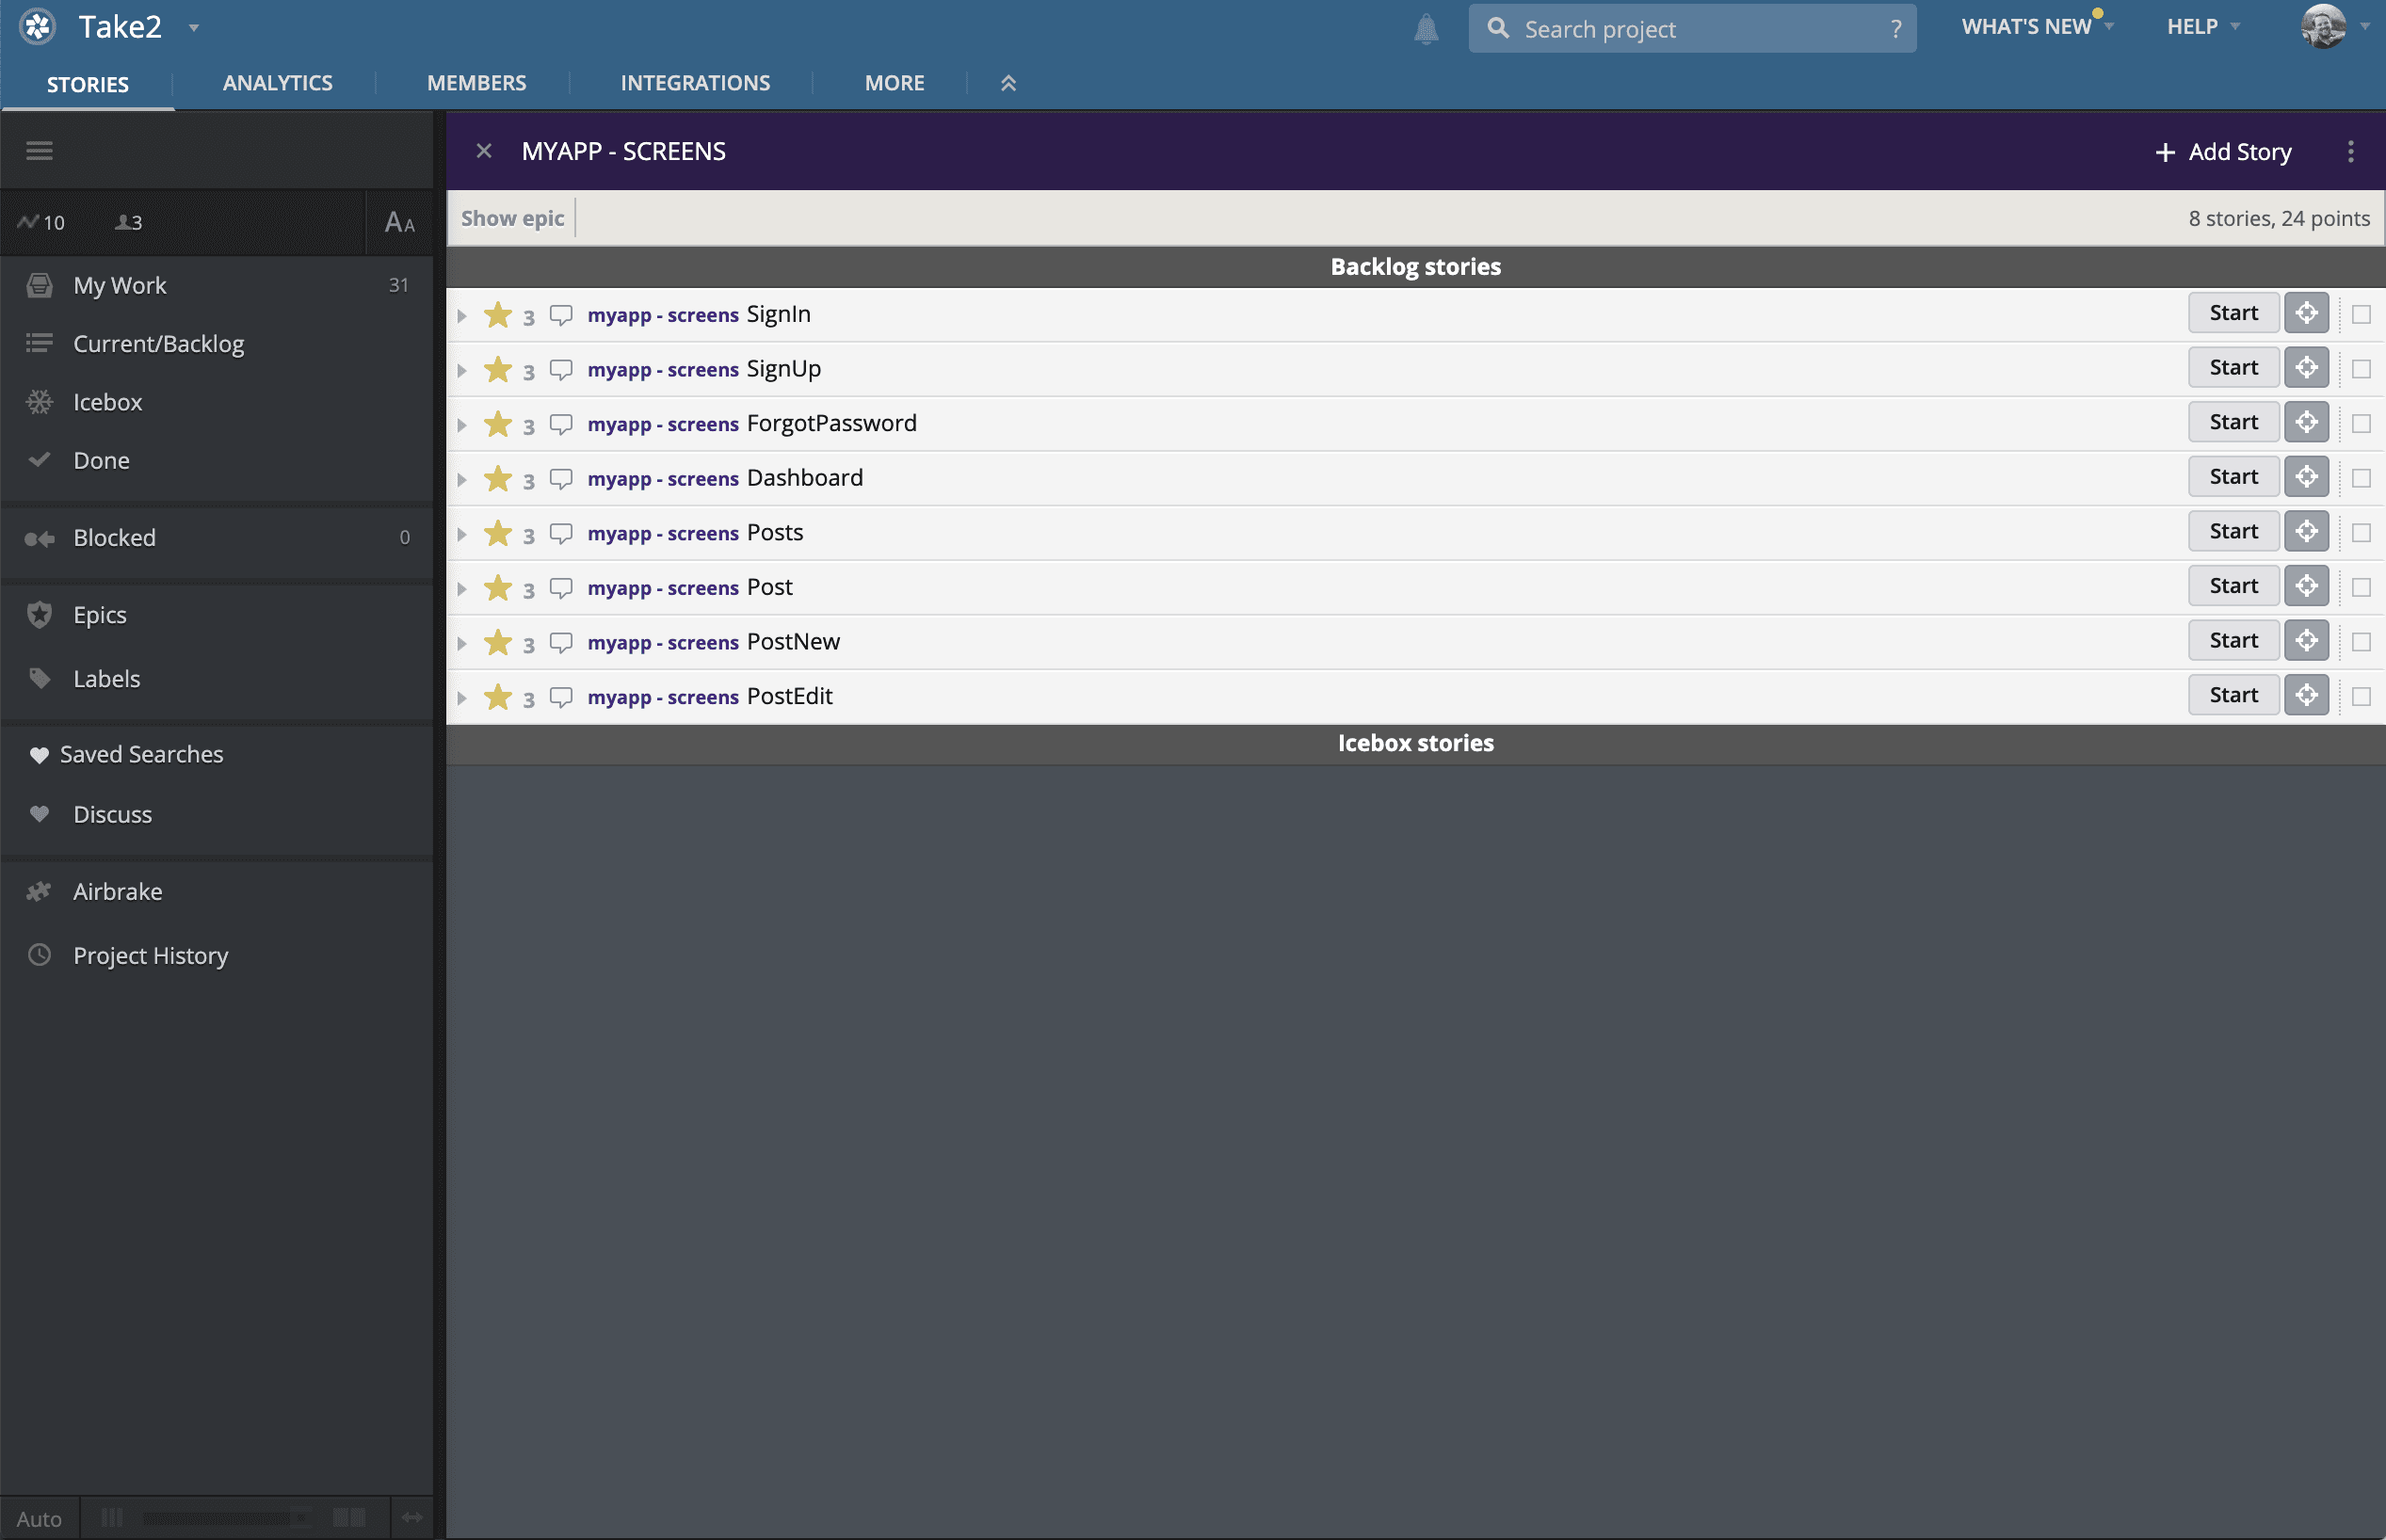
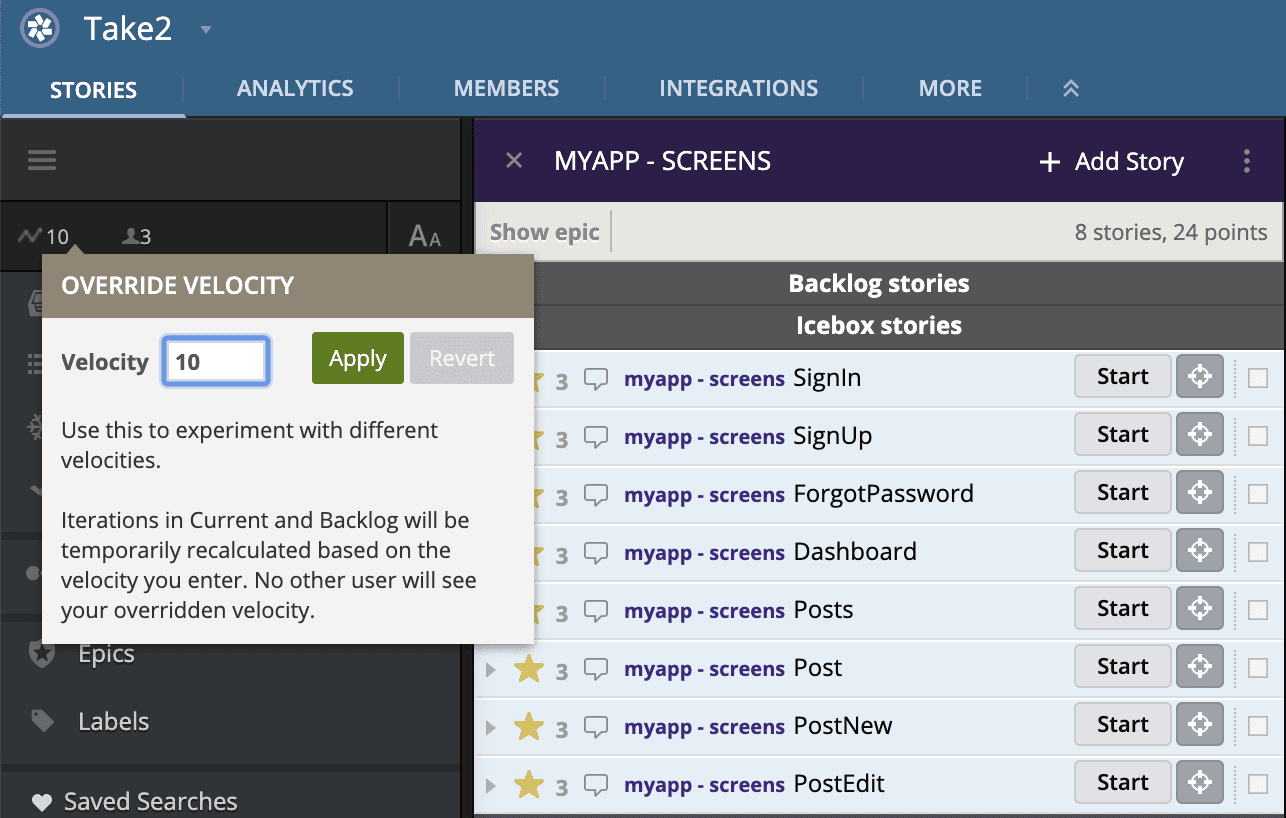
Now, you've defined (reduced) your screens, and everything is accounted for. Feel free to import your .csv to Pivotal Tracker. The result would look something like this:
Components
The next piece we'll reduce is our components. We did Screens first because it was the fastest and easiest. The same is now true for Components.
What is a Component?
Any piece of functionality commonly reused. A component could be as simple as a Button, or as complex as a SqueezePageDownloadForm. As long as it's used in more than one screen, it's a component.
To reduce your components, for each screen:
- Open the mock for that screen
- Make a list of components used on that screen
Keep doing this for all of your screens, until you have one big long list of components, that looks something like (ignore the comments):
TextInput # SignIn - Email Input
TextInput # SignIn - Password Input
Button # SignIn - Sign In Button
Link # SignIn - Create Account Link
Link # SignIn - Forgot Password Link
TextInput # SignUp - Email Input
TextInput # SignUp - Password Input
TextInput # SignUp - Confirm Input
Button # SignUp - Create Account Button
Link # SignUp - Sign In Link
...
It's fine to have duplicates, but...
Why duplicate?
- Being systematic helps you be more thorough and deliberate about each screen
- It's really easy to dedupe them
To dedupe your list, you can use this simple deduper.
Once you have your deduped list, you can now add them to Pivotal Tracker, or your tool of choice.
Infrastructure
The next, and often final, section of reduction is Infrastructure. The items in this list or epic will be any and all architectural decisions about how your application is to be developed.
A typical Infrastructure list would look something like:
| Epic - INFRASTRUCTURE | Points |
|---|---|
| Create repo | 3 |
| Setup CI | 3 |
| Conventional Commits | 3 |
| Framework Setup | 3 |
| Storybook | 3 |
| Webpack Config | 3 |
| Linter Setup | 3 |
| Prettier Setup | 3 |
| App Booting & Loading | 3 |
| MaterialUI // Semantic Setup | 3 |
| Theming | 3 |
| Routing | 3 |
| Assets & Image Loading | 3 |
| Apollo Setup | 3 |
| Firebase Setup | 3 |
| Authentication | 3 |
| withPermissions() - HOC | 3 |
or, in Pivotal .csv...
Id,Type,Title,Labels,Estimate,Description
,Feature,Create repo,"MYAPP - INFRASTRUCTURE",3,
,Feature,Setup CI,"MYAPP - INFRASTRUCTURE",3,
,Feature,Conventional Commits,"MYAPP - INFRASTRUCTURE",3,
,Feature,Framework Setup,"MYAPP - INFRASTRUCTURE",3,
,Feature,Storybook,"MYAPP - INFRASTRUCTURE",3,
,Feature,Webpack Config,"MYAPP - INFRASTRUCTURE",3,
,Feature,Linter Setup,"MYAPP - INFRASTRUCTURE",3,
,Feature,Prettier Setup,"MYAPP - INFRASTRUCTURE",3,
,Feature,App Booting & Loading,"MYAPP - INFRASTRUCTURE",3,
,Feature,MaterialUI // Semantic Setup,"MYAPP - INFRASTRUCTURE",3,
,Feature,Theming,"MYAPP - INFRASTRUCTURE",3,
,Feature,Routing,"MYAPP - INFRASTRUCTURE",3,
,Feature,Assets & Image Loading,"MYAPP - INFRASTRUCTURE",3,
,Feature,Apollo Setup,"MYAPP - INFRASTRUCTURE",3,
,Feature,Firebase Setup,"MYAPP - INFRASTRUCTURE",3,
,Feature,Authentication,"MYAPP - INFRASTRUCTURE",3,
,Feature,withPermissions() - HOC,"MYAPP - INFRASTRUCTURE",3,
API
Occasionally, your app will require either some API functionality be changed or added, or an entirely new API being built.
That's beyond the scope of this post (I hope to build write on how I build API's in the near term), but for lighter changes (a couple of endpoints changed or added), I would just do a small reduction of the required changes in an API epic. For example:
| Epic - API | Points |
|---|---|
| endpoint - /posts | 3 |
| endpoint - /post/:id | 3 |
| endpoint - /post/new | 3 |
| endpoint - /post/:id/edit | 3 |
or...
Id,Type,Title,Labels,Estimate,Description
,Feature,endpoint - /posts,"MYAPP - API",3,
,Feature,endpoint - /post/:id,"MYAPP - API",3,
,Feature,endpoint - /post/new,"MYAPP - API",3,
,Feature,endpoint - /post/:id/edit,"MYAPP - API",3,
... respectively.
Import to your tracker, and you're ready for the next step.
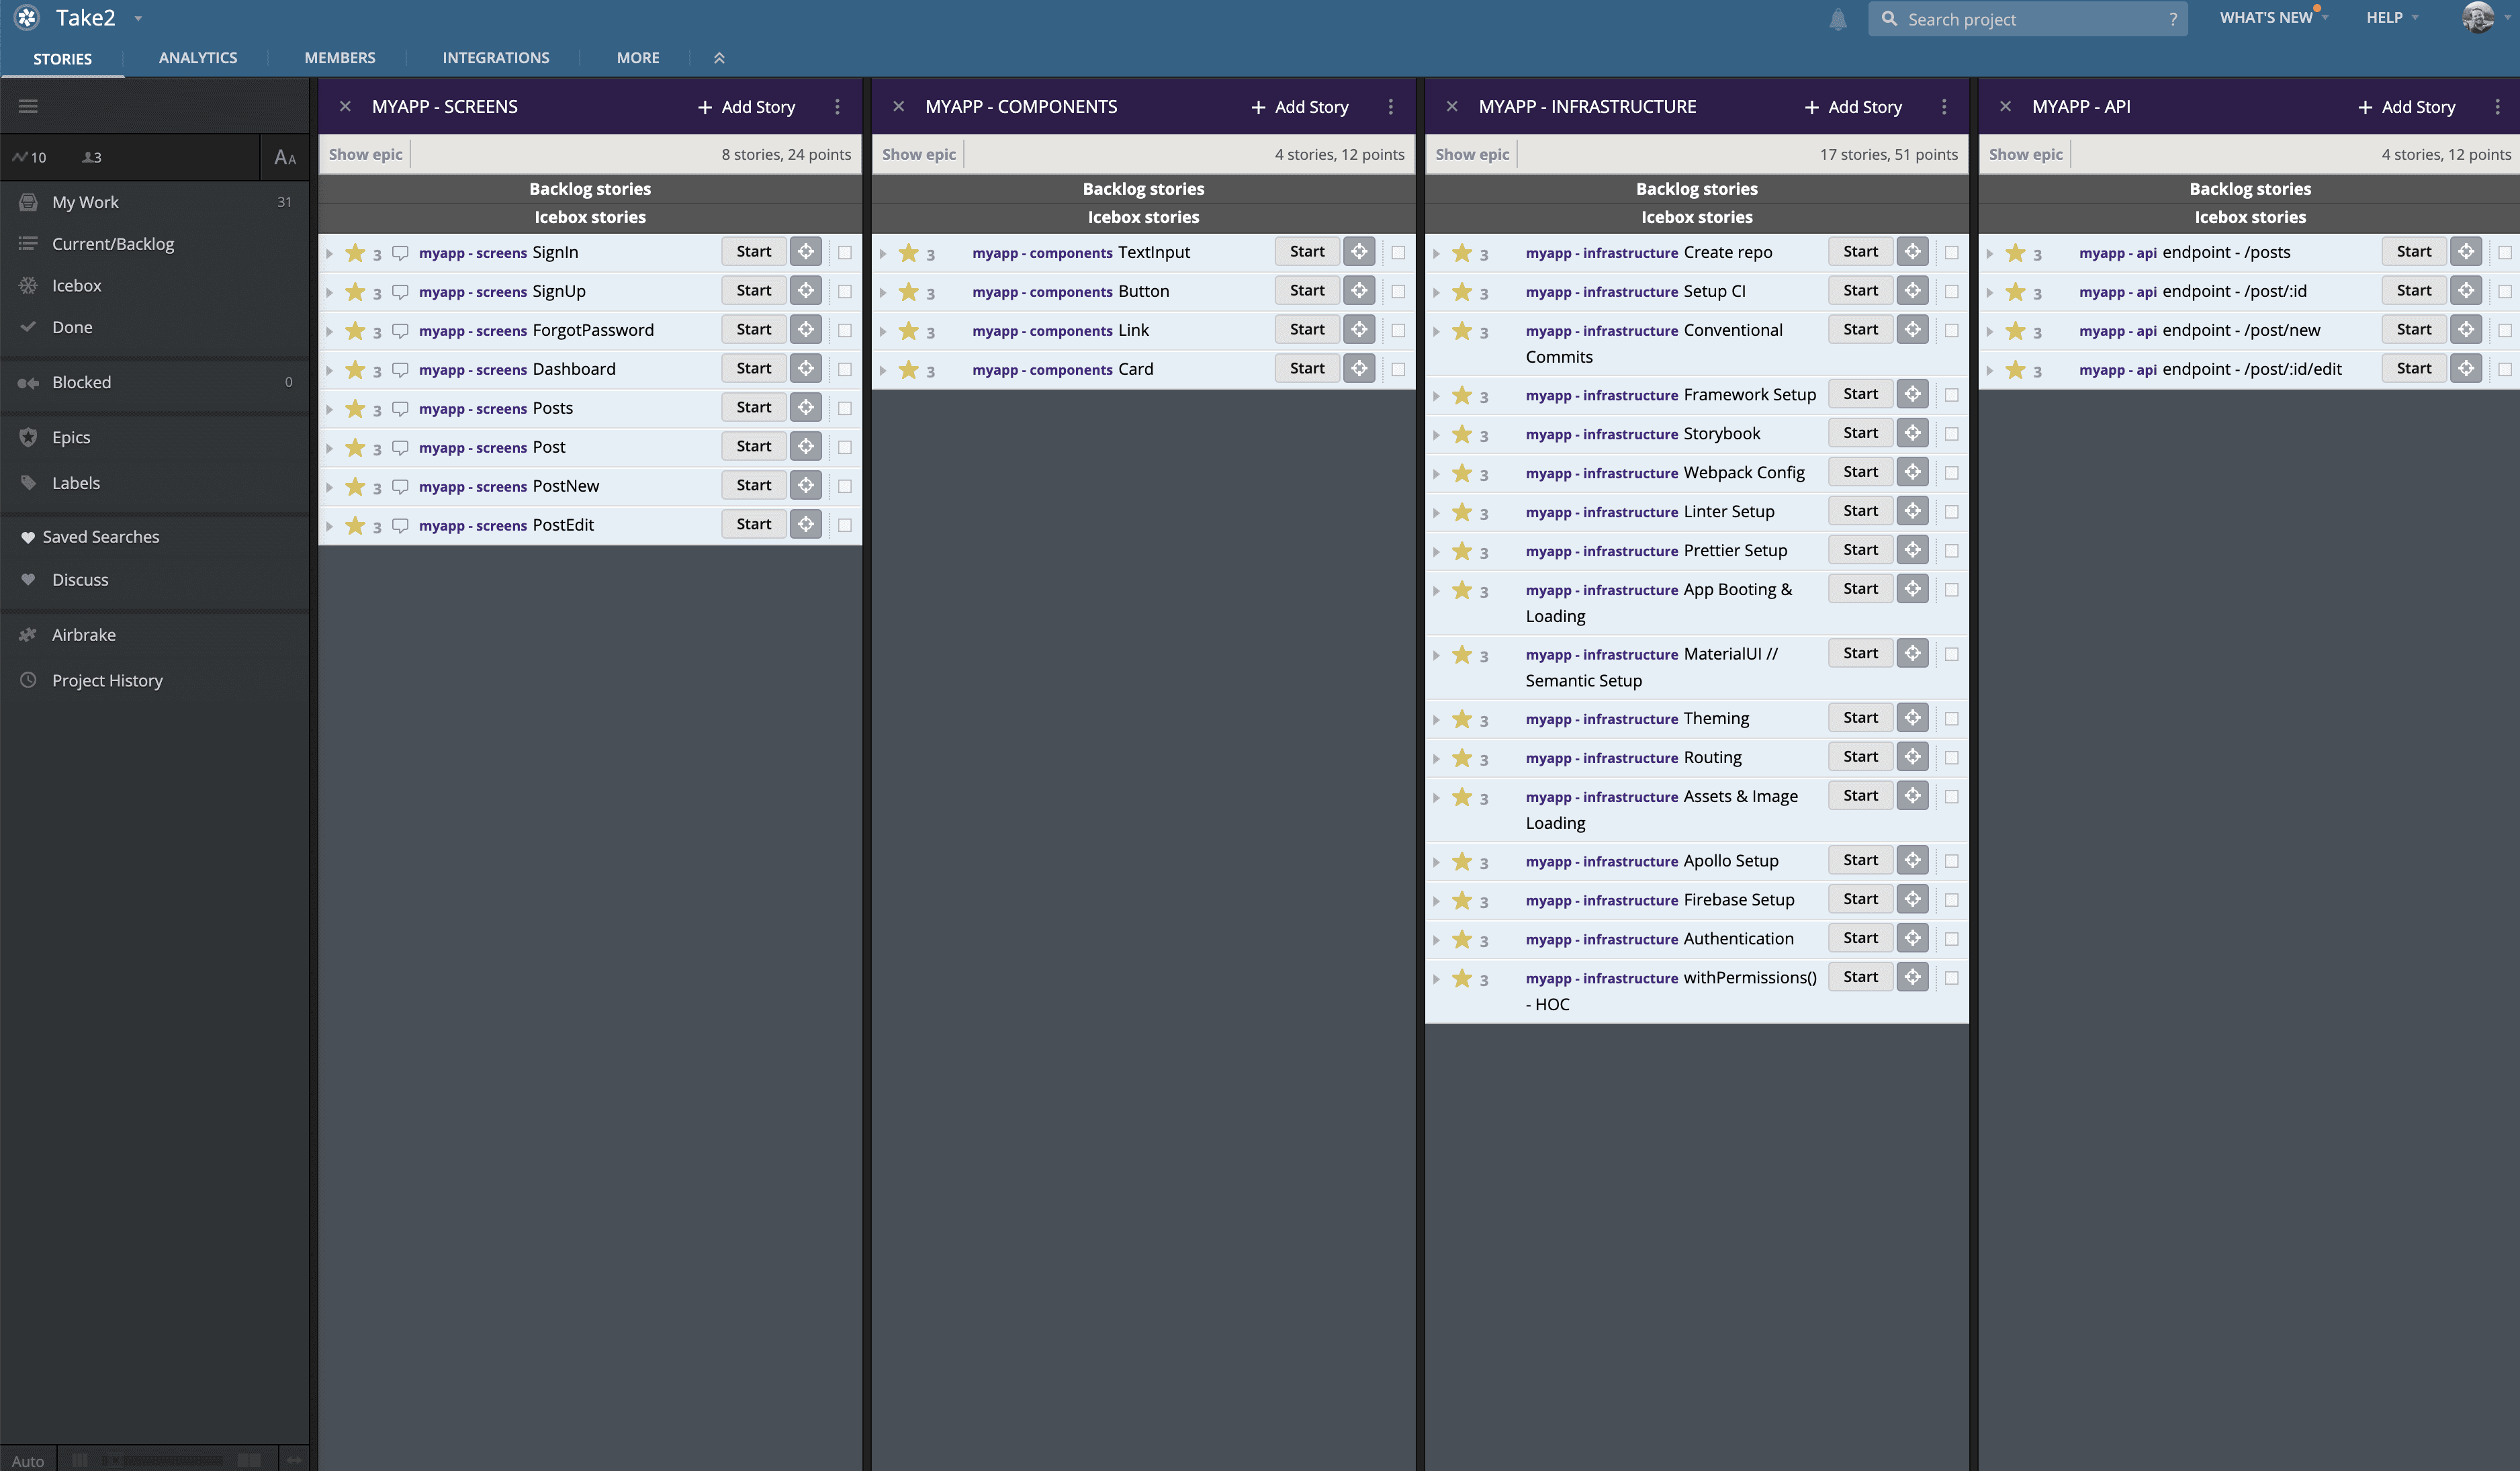
At this point, your board should look something like this:
Step 2 - Inversion
So far, we have effectively Reduced our application mocks into actionable items, and imported them to our board.
We used the order of SCREENS > COMPONENTS > INFRASTRUCTURE > API to achieve this as quickly as possible.
Now, we need to build it as quickly as possible. How do we do this?
Reversing the Epics
Take a look at what happens if you reverse the order of how we reduced:
API > INFRASTRUCTURE > COMPONENTS > SCREENS
Looks like a pretty sensible way to build our app, right?
Let's dig a little deeper to make it sticky:
#1 - API
We build this first. This ensure's that our client has everything it needs to persist data, authenticate, etc.
#2 - INFRASTRUCTURE
Next, we strap up all of the infrastructure and patterns we need for our application to work, scale, and have good developer stories.
#3 - COMPONENTS
Third, we build out our list of components. These will be the building blocks of our screens, and make screen develop incredibly fast.
#4 - SCREENS
Lastly, we build out our final screens. Because we have routing, data fetching, permissions, and components all built up, this is as quick and painless as possible.
Inversion of our epic order gives us a succint build path, optimized for speed. We now know what we're going to build, and exactly how we're going to build it.
There's one final step for project success, and that is setting up our Velocity.
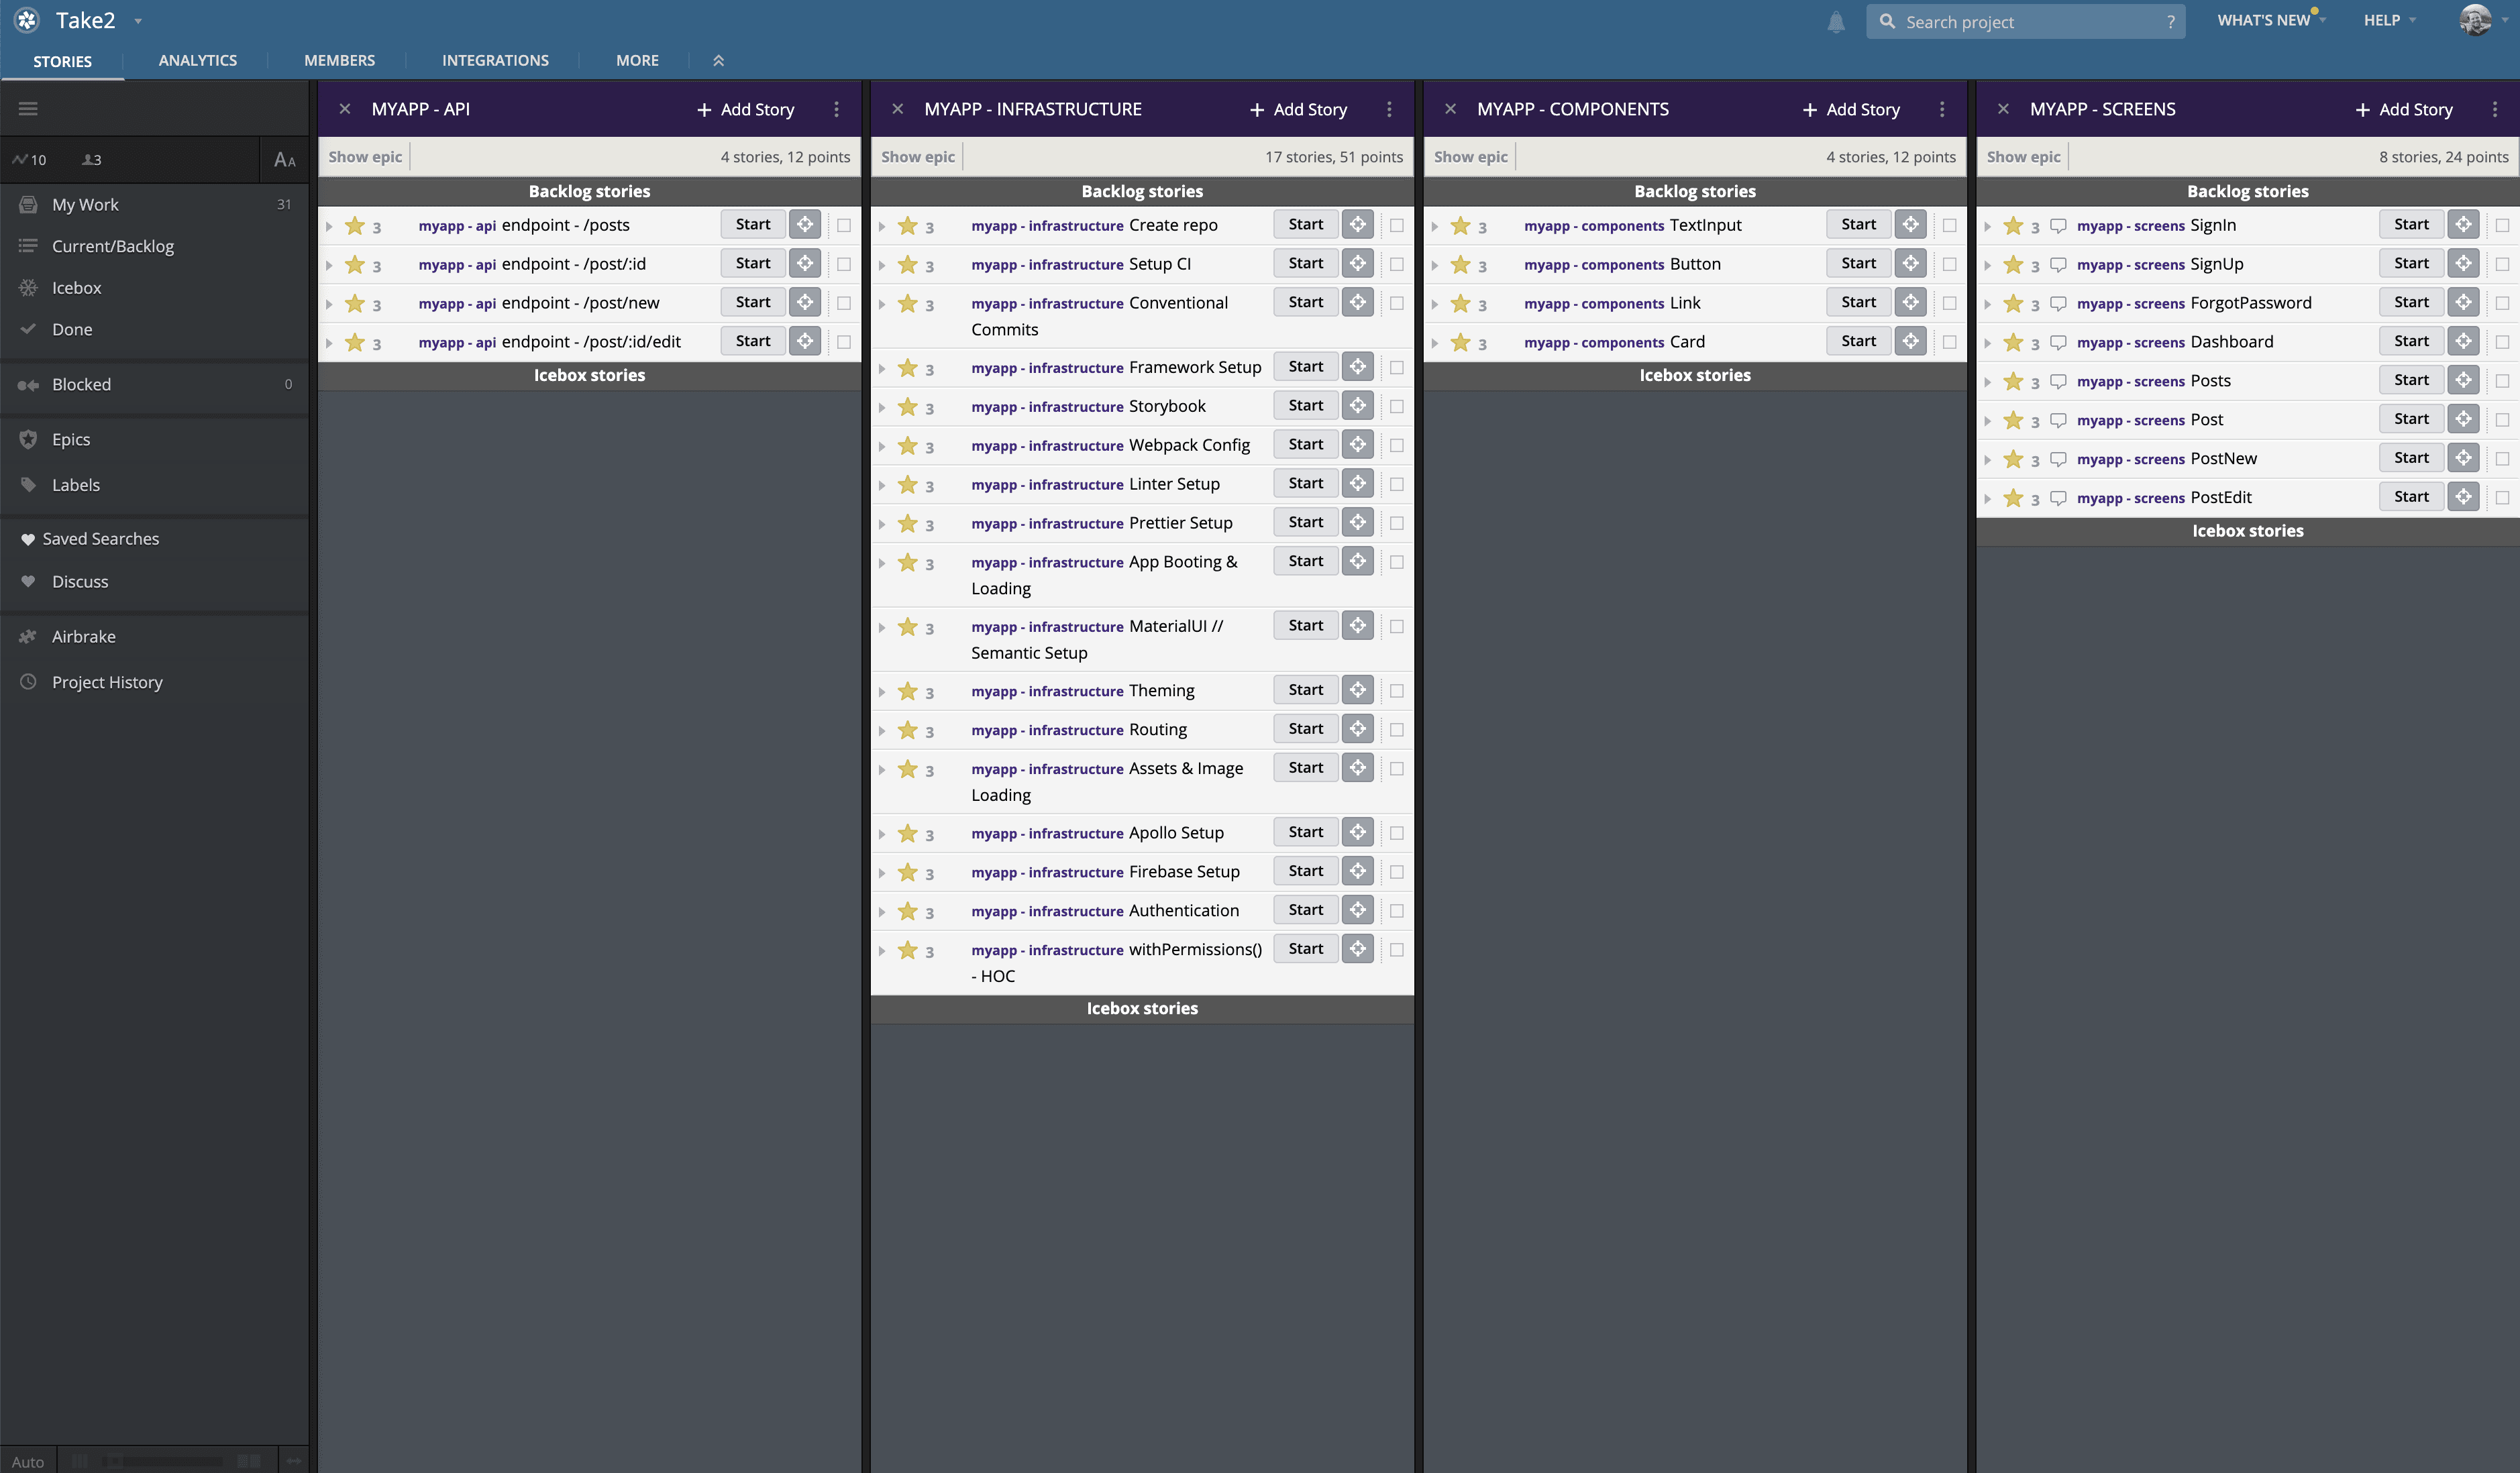
Once you have inverted your board, it should look something like this:
Step 3 - Velocity
So far we've answered:
Now we need have a base understanding of How fast can we build it by setting up and tracking our Velocity.
Guiding the Ship
The purpose of tracking our Velocity is two-fold:
- To know how fast we did a thing
- So that we can more accurately guess how fast we'll do another thing
If we can achieve #2, it will help us understand, as an organization, the body of work that we can get through in a week / month / year, so that we can better plan our product roadmap.
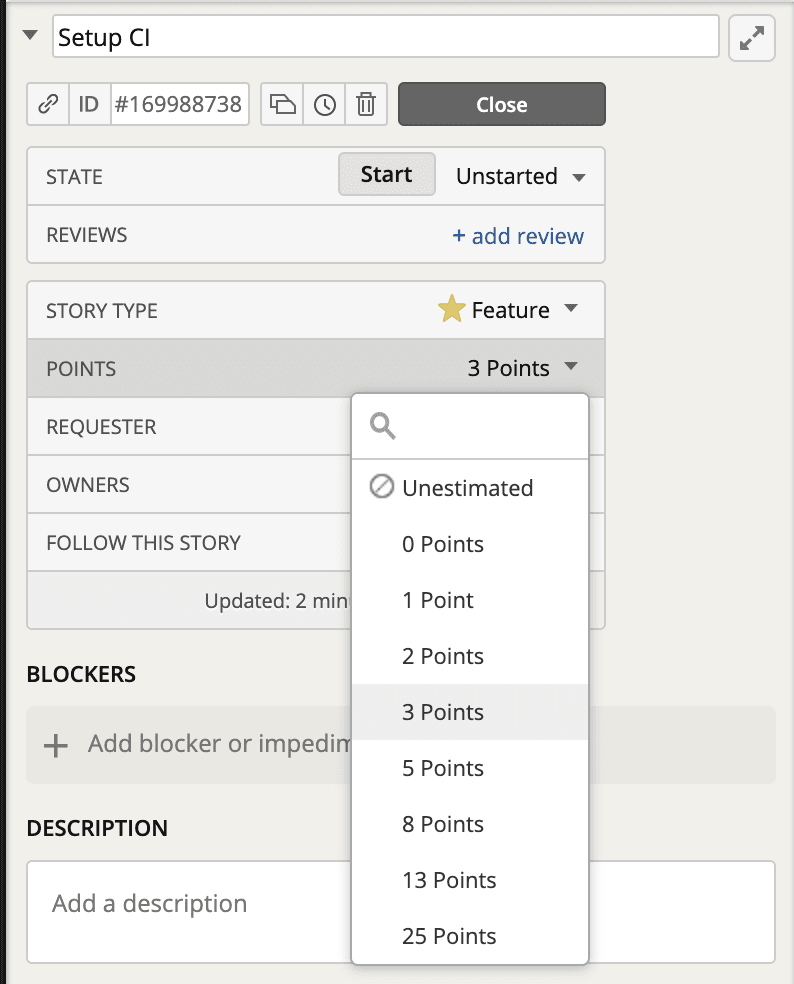
Point Values
To begin tracking your Velocity, you need to add point estimates to each item in the Epics from your Inversion.
I typically use an adjusted Fibonacci scale for tracking:
0,1,2,3,5,8,13,25
I typically use 25 points for placeholding Epics that need to be broken down later
Deciding on Point Values
There are many ways to decide on point values, but I typically prefer a variation on Planning Poker using at least 2, but no more than 4 team members. The basics are:
- Start with the first item in an Epic
- Each member picks a point value for the item (10 seconds)
- If all members agree, set the point value and move to the next item
- If not all members agree, discuss why, and come to a consensus. (2 minutes)
Setting Up Velocity
With the fundamentals in place, you're now ready to set point values for your API > INFRASTRUCTURE > COMPONENTS > SCREENS epics.
For each of these Epics, use the Deciding Point Values methodology (or your own), and assign point values to all items.
If you haven't imported to Pivotal yet, do this in your .csv import file. Otherwise, use the Pivotal UI to set the values.
Predicting the Future
After your first full week of development, Pivotal will automatically adjust your default velocity, based on the points you achieved that week.
You can then open the Current/Backlog panel and see how many weeks your build will likely take, based on that point value.
Step 4 - Build & Adjustments
Congratulations! You have effectively boarded out a major project! You:
✅ Know what you're going to build
✅ Know how you're going to build it
✅ Can make more educated guesses at how long it will take
Scope Changes
Now that you're building, your biggest worry is going to be feature and scope changes. Don't fret, though, because you have better assets than you used to.
When a mock changes...
Simply audit the mock the way you did, following SCREENS > COMPONENTS > INFRASTRUCTURE > API order, and update or add new items as needed.
If the work is already in flight, coordinate directly with the developer when you update the items, so the developer understands and can provide input on the impact of the change.
When new mocks are added...
Again, same deal. Just follow SCREENS > COMPONENTS > INFRASTRUCTURE > API, and new items as needed.
Other Tips for building fast
Here are some additional tips for building quickly:
- Lock spec & mocks.
Designers be designing. Once boarded, lock the mocks, and inform designers that no new creep will be allowed in this cycle. All changes will be viewed as new work, in a new cycle. - Keep it tight.
Make sure your engineers aren't constantly tied up in meetings, etc. Let them work. Have a 15 minute / day board review, at most. - Use Storybook.
Personally, I would set a hard requirement that all components be built with Storybook. You get better components, faster. - Take Time with Patterns.
Don't rush your application patterns, like routing, theming, etc. Spend time coming up with patterns that are fast and flexible, and provide a clean developer story.
Now go build! 🏎
If you enjoyed this article, please consider following me on Twitter
